Tips For Sewing Sequin Fabric
Mom and I went to Hancock Fabrics and found a swatch of sequin fabric measuring 1 yard and 7 inches. I bought it mainly because mom has a work function coming up and she wanted a shrug to wear over her dress. I have a couple of shrug patterns, so I thought I would give it a shot.
However, when I got online the next morning to research sewing with sequin fabric, I did not like what I saw. Most people said "You're going to break at least 5 needles, so stock up before hand!" I'm sorry, but that is the absolute last thing I want to do. Thats got to be horrible for your machine!! No, thanks. I do not want to put my machine under that kind of stress. Plus, I have yet to break a needle ((knocks on wood)) and I most certainly do not want to start now.
Mom chose this shrug pattern from my stash and she wanted pattern C.

I did read a few helpful hints and I decided to try a few of them. I turned the fabric sequin side down and traced my pattern onto the wrong side with some tailors chalk.

Then, I took a crappy pair of scissors and cut out the tracing. Once I had that cut out, I painstakingly took off a shit ton of sequins that laid in the path of my seam allowance. I wanted to make sure there was plenty of room for me to sew, so I sat for 4 hours and removed sequins. The easiest way I could come up with on removing them without putting the other sequins in jeopardy was to cut each 'bad' sequin once and slide the threads out of the slit instead of clipping the string that holds each row of sequins on. It took forever, but to do it correctly, one must not skimp on the details.


Its going to make a mess... oh what a mess...
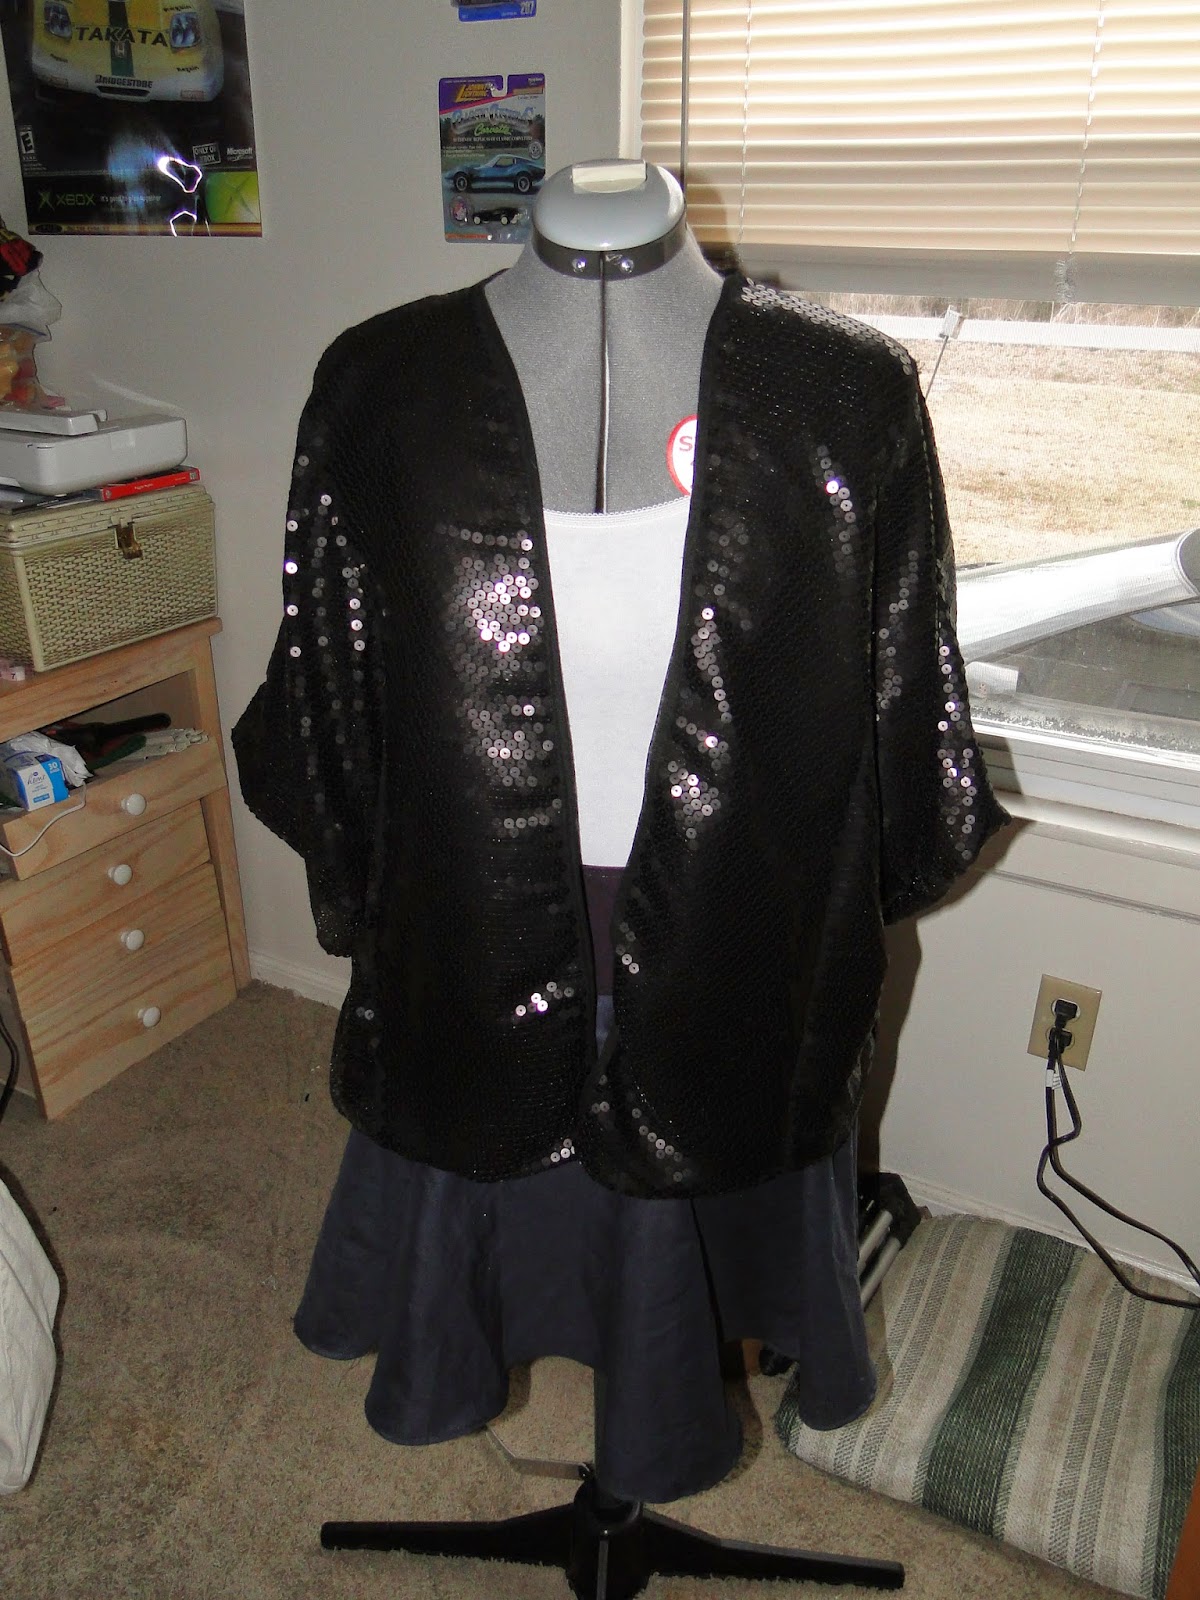
Once I had my seam allowances mainly clear (I had to snip a few errant ones along the way) I began working on the lining. This shrug pattern doesn't talk about linings, but since the sequin fabric isn't the most comfortable, I thought I would make a lining. I sewed all 5 of the lining pieces together, I attached it to the right side of my sequin fabric and began to sew. Once I got to the bottom hem, I turned the shrug right side out. I then sewed the remaining bottom hem and voila!!


This pattern was fairly simple and I would like to try a couple of the other shrugs from this pattern. The shrug mom chose only had 4 pieces and the instructions were easy to follow. That made making a lining easy, as there were only a few pieces to construct. The main thing was that it took lots of time to prep the fabric. I mean, lots of time. But 90% of it was prep time. The sewing time was short. But I'll tell you what, I don't know if I will ever sew sequined fabric again. It just took so long and I have a short attention span. haha. But I still like the way it turned out. :)
However, when I got online the next morning to research sewing with sequin fabric, I did not like what I saw. Most people said "You're going to break at least 5 needles, so stock up before hand!" I'm sorry, but that is the absolute last thing I want to do. Thats got to be horrible for your machine!! No, thanks. I do not want to put my machine under that kind of stress. Plus, I have yet to break a needle ((knocks on wood)) and I most certainly do not want to start now.
Mom chose this shrug pattern from my stash and she wanted pattern C.

I did read a few helpful hints and I decided to try a few of them. I turned the fabric sequin side down and traced my pattern onto the wrong side with some tailors chalk.

Then, I took a crappy pair of scissors and cut out the tracing. Once I had that cut out, I painstakingly took off a shit ton of sequins that laid in the path of my seam allowance. I wanted to make sure there was plenty of room for me to sew, so I sat for 4 hours and removed sequins. The easiest way I could come up with on removing them without putting the other sequins in jeopardy was to cut each 'bad' sequin once and slide the threads out of the slit instead of clipping the string that holds each row of sequins on. It took forever, but to do it correctly, one must not skimp on the details.


Its going to make a mess... oh what a mess...
Once I had my seam allowances mainly clear (I had to snip a few errant ones along the way) I began working on the lining. This shrug pattern doesn't talk about linings, but since the sequin fabric isn't the most comfortable, I thought I would make a lining. I sewed all 5 of the lining pieces together, I attached it to the right side of my sequin fabric and began to sew. Once I got to the bottom hem, I turned the shrug right side out. I then sewed the remaining bottom hem and voila!!


This pattern was fairly simple and I would like to try a couple of the other shrugs from this pattern. The shrug mom chose only had 4 pieces and the instructions were easy to follow. That made making a lining easy, as there were only a few pieces to construct. The main thing was that it took lots of time to prep the fabric. I mean, lots of time. But 90% of it was prep time. The sewing time was short. But I'll tell you what, I don't know if I will ever sew sequined fabric again. It just took so long and I have a short attention span. haha. But I still like the way it turned out. :)


Comments
Post a Comment