Tapestry Purse/Simplicity 1519 Review
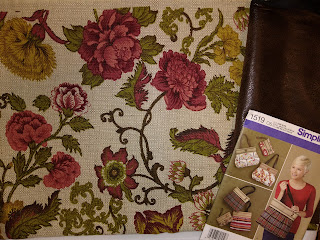
The other day at work we had some handbags on sale and I went looking through them and found a couple examples of tapestry purses. I really liked the idea of mixed media on a handbag, like leather and fabric. So I decided to make one, but with pleather and fabric. I used Simplicity 1519 and decided on version A. But instead of the jute, I wanted that part to be pleather. I also had this beautiful upholstery fabric that my mom gave me and I've been dying to use it. I thought it looked very lovely next to the pleather.
I did not get a lot of 'during' shots because it was pretty easy to follow, pattern wise. But here are some of the little details about it.

The 'before' of the closure. It was not supposed to have a flap closure thingy, but I wanted one. I took a piece of the pleather and sewed it right sides together and attached it to the inside of the back and measured where would be a good placement for the front. Then I attached my snap before sewing the lining into the purse, so you don't see any magnetic snap pieces inside. I made the tassel from some upholstery edging stuff that I got from the thrift store. Then I decided on a kind of triangle edge for the closure, so I tucked the ends under and glued them down with fabric glue. A lot of fabric glue. I also hand tacked the tassel's metal part onto the closure so it would stay in place.

The finished front...

...and the finished back.

Magnetic closure


It's hard to tell, but there are 2 pockets on one side and one larger on the other side.
I attached the remaining strap from my thrift store strap 2 pack onto this purse with a little of the pleather folded in half and hand sewed into the seam. I love this purse!! There is plenty of room for all my normal purse things... and then some! I used a very, very thick Heat'n Bond interfacing that I found at the thrift store on the pleather part to give it some strength. Also, per the instructions, I made an interlining and a lining out of the same fabric and I find that it makes for a nice sturdy purse. I have been using it for a couple of months now and I am really happy with it! Very easy to follow instructions. I can totally see making another one!


Comments
Post a Comment