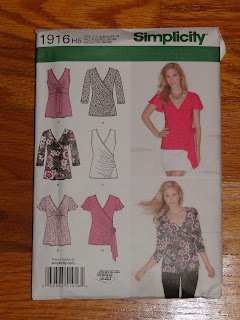
Simplicity 1916 Pattern Review
Happy New Year!!! I was just sitting around the house after what was a very rainy Christmas and my husband commented on the shirt I was wearing. I have had this shirt for years. Its a dark purple V-neck 3/4 length sleeved top with ruching on the sides. Its long, its cotton and its comfy!! Unfortunately, its also beginning to get holes on the under side of the sleeves which is weird to me, but whatevs. I had thought about just taking the sleeves off and replacing them with something else (which I also still might do), but I also thought 'Hey, I have a ridiculous amount of fabric! Mayhaps I should just make a new one!' So I went digging through my pattern totes and found Simplicity 1916.
I had my pattern, now it was time for the fabric. I looked around and decided on this lovely flowery fabric!

I chose this fabric for a couple of reasons. #1: Its pretty. Its super crappy outside with all the rain and no sun and I have been looking through flower catalogs in preparation of a spring order. Man, I have a lot of flowers in my shopping cart... Anywho, I thought it would brighten up the place to be flowery. #2: It needed to be stretchy fabric for this pattern and I didn't have a whole lot of stretchy fabrics that I could picture being made into this top. If all goes well, I will make more in some boring fabrics to go with printed skirts, but for now, flowers it is!
I chose option D and the pattern itself was pretty easy to construct. I did have an issue with the pleats on the bust area, but only because when I went to mark the pleats, I couldn't get the chalk to mark very well and the blue/purple pen marks just disappeared into the flowery pattern. To remedy this, I decided to add a little bit of stabilizer onto the pleat area just to mainly mark where the pleats would go.


And I used this to help with the stabilizing...


Badda BOOM!!!! Look at my new iron!!!!! This thing is a BEAST!!! Behold the Oliso TG1050 Smart Iron!!! My wonderful husband probably got tired of hearing me yell at my old iron, so he got me this for Christmas. I have always wanted one of the irons that have the feet that come out when you stop ironing and now I have one!! I was so freakin happy to get this because my old iron was just something cheap that I had bought for myself when I worked at Best Buy. It spit at me all the time and sometimes it would just shoot out steam when I wasn't using it. It leaked when I took it on the road and it was small. This new iron has a steam button so I can steam something while its upright, it has the badass feet that pop out when I'm done using it because of the awesome touch sensor on the handle, and it is super easy to fill. My old iron had to be balanced on its end and carefully filled at the tip. I cannot sing its praises enough! Oh, and its got a HUGE sole plate that is super shiny and lovely. Man, I love this iron. haha.
Anywho, construction was easy peasy and the option D only consisted of 5 pattern pieces. I had wanted to do the 3/4 length sleeves, but I didn't have quite enough fabric, so I went with the flutter sleeves. I used a zigzag stitch on all of it because I don't have a serger and I wanted it to be able to stretch. I also changed the back pattern piece slightly. It called for 2 pieces to be cut and stitched together on the center back seam, but I thought that was silly when I could just cut it on the fold. So I cut it on the fold and saved a step. Everything else went along smoothly and it was quite fun to make.

My husband actually liked it without sleeves, so I might make a sleeveless version for summer.


I love this top and I can picture making one in classic black or maybe a blue. Very pleased!!! :-D


Comments
Post a Comment